Showing posts with label bag. Show all posts

Tuesday, 20 December 2011

Anna’s got a brand new bag

Annas bag 011

Well it's that time of year again when all my friends put their names in a hat and we choose our Secret Santa. Last Christmas I gave you my heart I got my friend Meliosa and made her one of my Curvy Clutch bags (pattern from Keyka Lou) in silver with a royal purple lining and embellished it with a purple feather hair clip which really takes the bag from plain to party!

Annas bag 012

This year to save me from tears (OK, I'll stop that now) the name pulled out of the hat was my friend Anna. This was quite a coincidence as all of this past year she has been dropping not-so-subtle hints that she would like one of my bags! So it was pretty easy to decide what I should give her! The only minor problem was that we got our Secret Santa names quite late this year and I didn't know if I would have the time to make a bag. Even so, I thought I'd check my fabric stash and have a look in the fabric shops to see if I could find a suitable fabric that Anna might like - urgh...it's really hard to pick a fabric for someone else, I just couldn't decide if she would like any of the fabrics I found!

Annas bag 020

However, I did have a small stash of already made bags that I had started to accumulate (in the hopes of starting up a shop). So after some deliberation I decided that Anna would like (eek - I hope so!) this bag. It's made from an old pair of trousers of mine (hmmm...can't decide if I should tell her that yet or not - what do you guys think, would that sound weird?!!!) which are like a kind of tweed with a gorgeous bronze sparkle through it. The inside is lined with purple tie-die batik which you may remember from my purple and red dress (from a good while ago!).

Annas bag 021

The bag on it's own is lovely, but since Mel's bag was embellished with a feather clip, I thought I'd better see if I could get a suitable one for Anna's bag. This was harder than I thought it would be - feather hair clips mustn't be as fashionable this year as last! But after a thorough search I stumbled across this lovely clip with fuchsia, plum and olive feathers - it picks out the various colours of the bag perfectly.

Annas bag 023

And the best thing about using a removable clip is that without it, the bag can be used in a more informal setting. Oh, and you can obviously use the clip elsewhere, so it's like a bonus gift!

Annas bag 024

 Fingers crossed she likes it!

Wednesday, 14 December 2011

Mini Handbags


I aluded to a couple of little handbags that I made from my nieces Christmas presents on this post, but then promptly forgot to take proper photos of the bags - well done me! One got shipped off to Australia on the 5th December (last posting day for Oz, I love a deadline!) and then I was merrily packing up the second one to post to England when I realised I should take a few quick snaps to share with you!

These are made using the Keyka Lou Half Moon handbag pattern (I can't seem to find the pattern on her website, perhaps she isn't selling it anymore), which I also used to make a black and silver bag earlier this year. Because I was making them for a 5 and a 7 year old I thought I should down-size the pattern, so these are reduced by 20%. I was worried that it might make it a bit fiddly to work with, but it turned out fine.


The inside is lined with pink polka-dots (which you may recognise) and I used a mini magnetic snap (so cute!). Having studied Geology at University I really should know better than to take a photo of a subject without including a scale, so you will just have to believe me when I tell you that the bags is about 7inches across!

I'd love to get some photos of the bags in action, but since I don't see my nieces very often (such a shame) I can't promise anything, but I'll see what I can do.

Is anyone else making any Christmas presents this year? Have you got them all done or are you still frantically working away?! I'd love to see what you have been working on - do post a link of you have blogged about them.

Tuesday, 29 November 2011

Tuesday’s Tutorial Treat–Christmas Edition 1

TTTChristmasEditions
Well it’s back! Did you miss your weekly instalment of Tuesday’s Tutorial Treat. Yes yes, I know you did! Winking smile
For the next 4 weeks I thought I’d focus on tutorials that celebrate this festive time of year. Today is all about handmade presents – there’s still time to whip one up. Perhaps these might provide some inspiration for that person who you just can’t find the right thing for!

children's sewing kit2 inside 2
Starting with quite an epic one, this is a tutorial from Chez Beeper Bebe for the most adorable sewing box. I just love it! The tutorial even includes details on how to make the very cute lady pin cushion (although I do feel sorry for her having pins stuck in her forehead!) and a needle book. Link HERE.

6a00e54fb575988834015434d4c07c970c-800wi
Next week have the cutest little zip pouch from Keyka Lou. I get all my bag patterns for Keyka Lou as I love her designs and her instructions are excellent. This is the gorgeous Dumpling Zip Pouch which she very generously offered up for free on her blog. It would make the perfect present for a little girl, filled with cute pink sparkly make-up! Link HERE.

IMGP3318
Here we have the sweetest little iPhone pouch from During Quiet Time. I think I should make one of these as a present to myself as I have an iPhone, but no cover…and it’s starting to look a little worse for wear! Link HERE.

fathers-day-tie-425
And finally, something for Dad! I find my Dad the hardest person to buy for at Christmas and Birthdays. He just doesn't need anything. But sometimes presents aren’t about need, but more about a wee treat! How about making the man in your life a rather stylish tie – this tutorial from The Purl Bee should be just the ticket. Link HERE.

Friday, 25 November 2011

Please don’t go…I’m still here!

Oh dear, oh dear, oh dear! My poor little blog has been terribly neglected for over 6 weeks. I’ve actually been quite busy with the sewing machine (although it has been acting up a lot…I have now become very familiar with the little screw on the bobbin holder) but my problem has been with the light. I know this has been an issue with a lot of Northern Hemisphere bloggers at the moment…trying to find an opportunity to get some decent pictures of our projects during daylight hours. Now that I am going to work in the dark, and coming home in the dark (and suffering from SAD….thinking about getting a lamp…anyone got one and have any recommendations?) the only chance is at the weekends, and unfortunately I just haven’t had any opportunities (my boyfriend thinks weekends should be spent with HIM, not in the sewing room – the cheek of him! Tasia’s post this week made me think of that!).
If you have been following me on Twitter (@Su_Sews_So_So) then you may have noticed a few Instagram pics that I posted. With no other decent project photos, and the blog being non-existent lately, I thought I’d share them on here too:
6b2bce80065e11e1a87612313804ec91_7
As I mentioned in a previous post, I have been beavering away on making bags to sell. These are my latest pieces, but I really want to get a decent amount made up before I launch my shop and do a full reveal – do for now, this is just a sneak peak!
188531ca16ea11e1a87612313804ec91_7
I posted this last night as they were hot off the sewing machine. I’ve made a couple of mini handbags for my two nieces for Christmas and I’m so pleased with how they turned out! I’ll see if I can get a proper ‘photo shoot’ of them this weekend and share them with you all next week – and then I have to get them wrapped and in the post asap as one will be winging it’s way to Australia.
And I have also made a Sorbetto top, out of beautiful buttery voile…but I’m not overly joyed with it so I haven’t been very excited about sharing it on here! My boyfriend and my mum both say it’s lovely, but I personally think that it doesn’t really suit me. Ah well, I guess I will share it on here and see what you guys all think.
Finally, I am STILL (yes, still!) working on my purple Jenny skirt that I mentioned on this post. I’m currently fighting with the invisible zip. It’s in, and it looks OK…but it’s not really ‘invisible’ at the moment, so I’m trying to sew it a bit closer…but it involves a lot of cursing and screaming so I’ve been putting it off a little! Now that I’ve got the Christmas pressie bags done I have no excuse I can focus on the skirt.
And even though I have been rather quiet on the blog, I’m delighted that over 100 of you decided you liked the place enough to click ‘follow’ on Google Connect! Thanks so much guys. Sorry I’ve let you down recently…how can I make it up to you? Oh I know…how about a giveaway??!!! That sounds like a plan, a wee Christmas treat for one of you – I’ll post details soon!

Tuesday, 9 August 2011

Tuesday's Tutorial Treat: Jumper to Bag Refashion


Hi Folks - I'm back from my holidays. Lots and lots to share with you, but I haven't had a spare second to get the photos sorted so for now I leave you with quite possibly one of the most awesome refashions I have seen:


How to refashion a jumper (sweater for you guys over the pond) into a roomy bag - why didn't I think of this!!!! Featured on A Lemon Squeezy Home.

Link HERE!


P.S. Boy you guys have been busy over the last month...I had almost 1000 blog posts to read in my reader! And me being me, I didn't want to miss out on anything and have finally caught up and read them all - phew!

Tuesday, 5 July 2011

Tuesday's Tutorial Treat: Box Pouch


I'm loving this new feature - I really do hope that some of the tutorials are new finds for some of you. I'm also loving that I can schedule these posts in advance - as today I'm (hopefully!) arriving in Kuala Lumpur and starting my Malaysia/Thailand holidays!

Today I'm sharing a really brilliant tutorial for a fully lined zippered box pouch from It's A Pretty Modern Life. This pouch would be perfect for make-up or travel toiletries. I haven't made it myself yet, but it's top of my list at the moment - so expect to see my version on here very soon! Have any of you made this yet? Do send me the links if you have.

Tutorial HERE

Wednesday, 29 June 2011

Oh I do like to be beside the Seaside!


I'm off on my holidays on Monday - and I. Can. Not. Wait! My boyfriend and I are jetting off to Kuala Lumpur and then touring around Thailand for three weeks. I have been before and I also grew up in Indonesia, so I have quite an affinity to Asia. But this will be the furthest my man has travelled and the first time in Asia - so I will be tour guide for the three weeks (the poor soul doesn't realise yet that I have organised out Bangkok sightseeing around all the best fabric shops!).

I've been busy trying to organise my wardrobe for the three weeks - much harder than it sounds. I'm taking a rucksack rather than suitcase, so space is at a premium. And because we are doing so many different activities (City break, jungle trekking, beach hol, scuba diving) it's hard to get the right balance. I think the key is to pick a colour scheme and work everything around that. Mine has turned out to be Red, White, Blue and Black.

My other issue was my hand luggage bag. I didn't want anything too big, as it would be cumbersome while walking from place to place with my rucksack on my back. After trailing the shops unsuccessfully, I decided I should just try and make something (as hinted here) - and therefore be able to tailor it to my needs....those being:
  • Zip closure (for safety)
  • The right size for hand luggage requirements
  • Easy to carry
  • Lots of pockets
  • Suitable to double up as a beach bag
  • Therefore must also be large enough to carry a big towel and other beach paraphernalia!

And so my holiday bag was born:

I pretty much made up the design - but it's really just a classic tote bag (with the pinched bottom corners) with a zip closure. Because I wanted it lined, I followed a tutorial on how to make a lined zip purse - but just scaled it up considerably! You can see from the photo below that I managed to line up the stripes pretty much perfectly (if I do say so myself!) on either side of the zip.


The straps are sewn into the base, and just over half-way up the bag for extra strength. They are made up of quite rough hessian type fabric, so I decided I needed to sew fabric onto the tops of them so that they wouldn't rub my shoulders or hands raw when carrying the bag! It ended up turning out to be one of my favourite features of the bag.


I decided to add a fun contrasting outer layer, which, when the straps were sewn down, created three pouch pockets on either side of the bag - perfect for carting your suncream and book to the beach. For neatness, I lined this strip too.


 As you can see the photo above, I didn't line up the red stripes at the sides. But you know what? I quite like it like that!


Inside the bag I made two types of pockets. On one side, I used my newly acquired skill to make a zipped pocket (learnt from making this bag) - again, super-sizing it!


And on the other side I used some left over red striped fabric to make a pouch pocket which was sewn onto the lining. I was going to divide it up into multiple pockets - but in the end it just has the top left hand corner separated into a pocket big enough for suncream, or mobile or wallet (something small basically!). I left the rest open as I'm going to be taking an A4 size folder with all my documents in it, and this fits in perfectly (it will also fit the all important glossy mags to read on the very long flight too!). It does flop open a bit though, so I put a little velcro closure on it.

Oh, I cannot wait to put this bag into use! Hot, sunny climes - here I come!

Thursday, 23 June 2011

What am I working on...


Just a little sneak peak at the latest project that has been under my sewing machine. Yep, another bag! What can I say, I LOVE bags (my boyfriend would say I love shoes...but I can't make them....yet!)!!!

Wednesday, 15 June 2011

Half-Moon Handbag


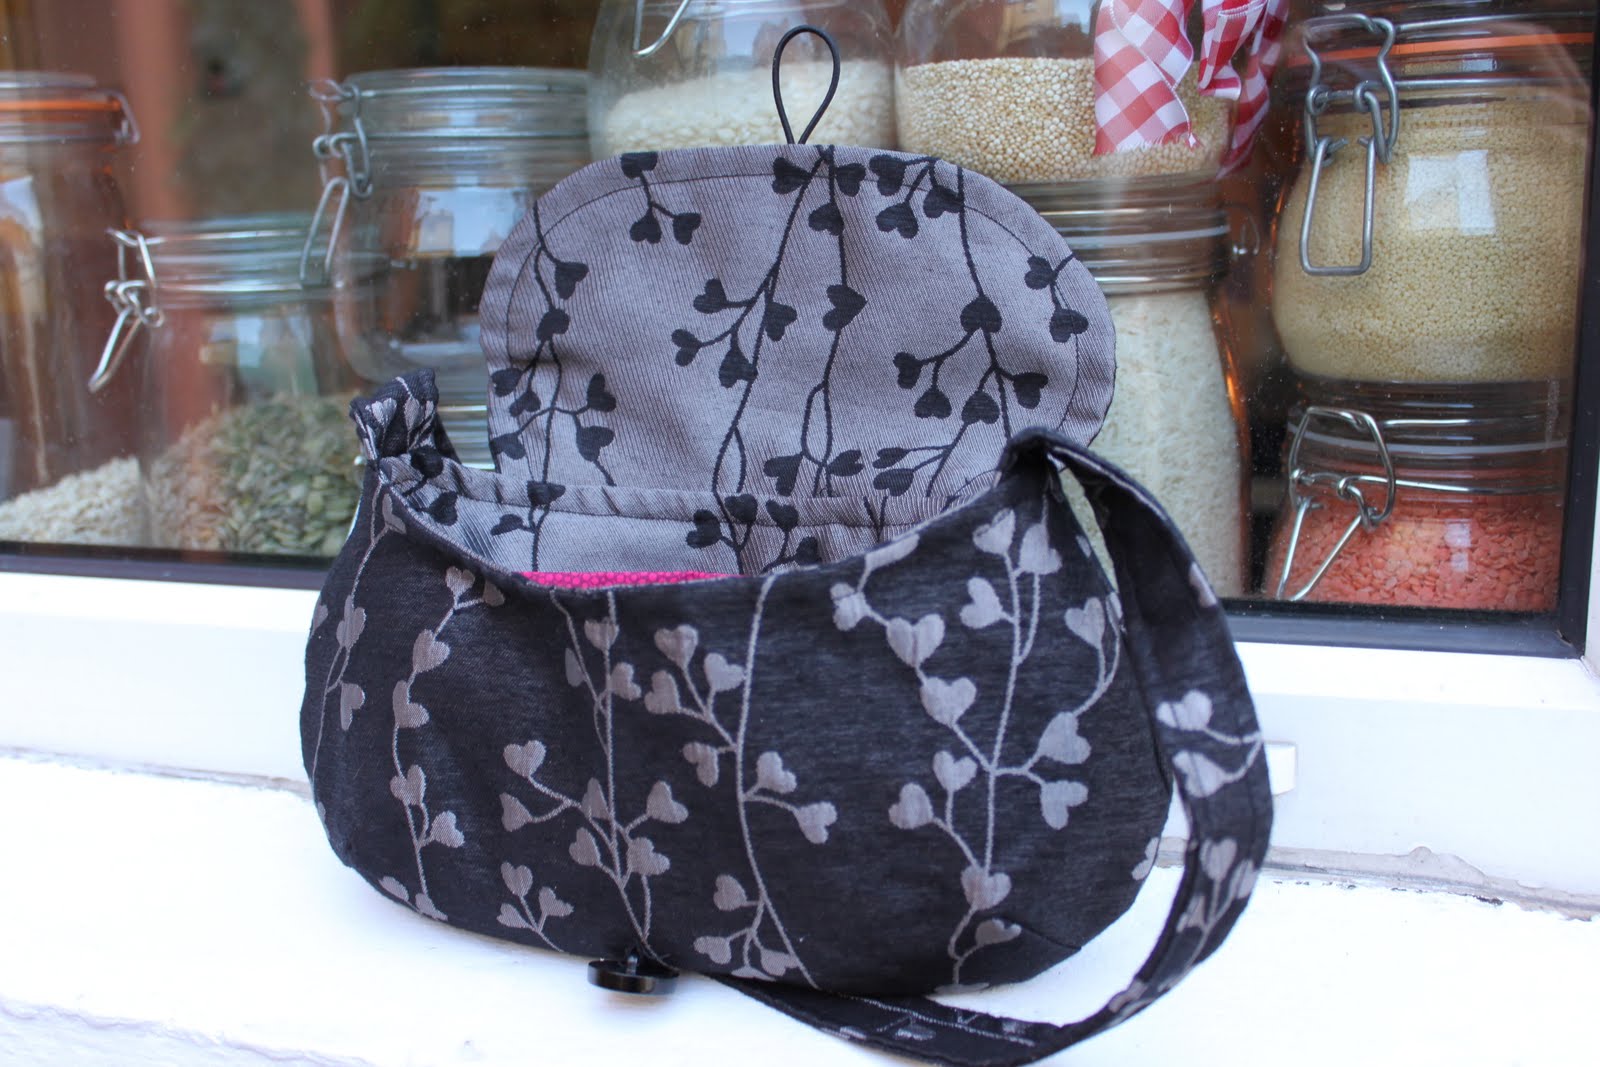
My latest escapades in bag making has produced this very handy Half-Moon handbag, again by my favourite bag pattern maker Keyka Lou (I've had a look on her site to link directly to the pattern, but can't find it! Perhaps she has discontinued this pattern?). I decided to make this bag, which is very similar to my curvy clutch design, but with a shoulder strap, as I am in desperate need of a black handbag that will go with everything and is small enough to take out in the evening - and I think this fits the bill pretty well.


This bag came together rather quickly. It's not as sturdy as my clutch, as it doesn't include sew-in interfacing, which made it a lot easier to sew. The closing is a hair elastic (!) sewn into the flap, which loops round a shank button that I had in my stash.


The fabric is a curtain sample which I had picked up for £1.50 from my local fabric shop. I had planned to line it with plain black cotton, however when I unpicked the white lining off the curtain I discovered that the 'wrong side' of the black fabric was the reverse of the pattern - I knew it would work great as the bag lining.


The pocket adds a fun pop of colour when you open the bag. I have to admit, this bag is a lot tamer than I would normally like to make things, but I wanted to make sure it was as versatile as possible.

I hinted recently about being one step closer to my 'dream' - which is selling my bags. Easy enough you would think, but I seem to be a big procrastinator! Anyway, although I don't plan on selling this bag, I thought I'd sew in one of my prototype labels. I plan to call my line 'Third Time Lucky' as all the pieces will be made from recycled fabric and restyled to give them a new lease on life and another chance at being loved! I've been slowly (my boyfriend would debate that choice of word!) collecting second hand clothes and other bits of fabric (for example this curtain sample) which I think will work well being refashioned into bags, or other things, so I have quite a lot of resources ready - I just need to get going...I'll keep you posted!

Friday, 10 June 2011

Work in progress

Thanks for all your feedback on my question about how to approach telling people you have made something - it was really fun to read all your comments, and it's good to know that I'm not the only one expecting to be showered with compliments whenever I'm wearing something me-made!!!

I'm so glad it's Friday - I've had a really awful week in work and I'm about to head out for a well earned dinner with my man....yeay!

So I'll just leave you with a couple of pics of what I've been working on this week. I'm really excited about this...for a couple of reasons...

One - it's turned out really nice (I'll try and take proper photos over the weekend to share the end result with you next week)...


and two - it's one step closer to my dream....

P.S. I have also finished my lace dress, which I hinted about previously...but the weather has been so dismal recently that photo ops have been few and far between - fingers crossed for this weekend guys!!!

Sunday, 8 May 2011

Jen's Bag - TUTORIAL

Long time no post - whoops! Sorry about that folks, life has been pretty hectic these last few weeks.

But I'm delighted to be back and to finally give you the tutorial to Jen's Bag. You may remember I showed you the finished bag back in March for my friends birthday present and promised to give you the tutorial. I can't believe I'm only getting the tutorial on my blog now, but those annotated photos took a lot longer than I thought they would!!! Anyway - enough excuses, let's get on with the tut:


Ingredients:
1 large man's shirt
30" x 34" piece of lining fabric
10" x 12" piece of lining fabric
9.5" x 4" piece of medium weight iron-on interfacing (approx)
Thread, sewing machine, pins, ruler!

Method:
1.
Cut 2 rectangles 15" x 17" (38cm x 43cm) out of shirt. I chose to have the shirt buttons running horizontally across the top of the bag. You can position the buttons as you like. The size of the rectangles was dictated by the size of the shirt - so choose your size as you see fit.


2.
Cut 2 more rectangles the same size from the lining fabric (I used brown linen)


3. Pocket
A. Cut off one shirt cuff. Cut a rectangle 1.5" (4cm) larger than cuff length. My cuff was 9.5" (24cm) so my pocket piece was 11" (28cm) long. The depth of the pocket is up to you. I cut mine 9.5" (24cm) which will make the finished pocket about 4.75" (12cm) deep.


B. Pocket Interfacing: Cut a piece of medium weight iron-on interfacing 9.5" x 4"

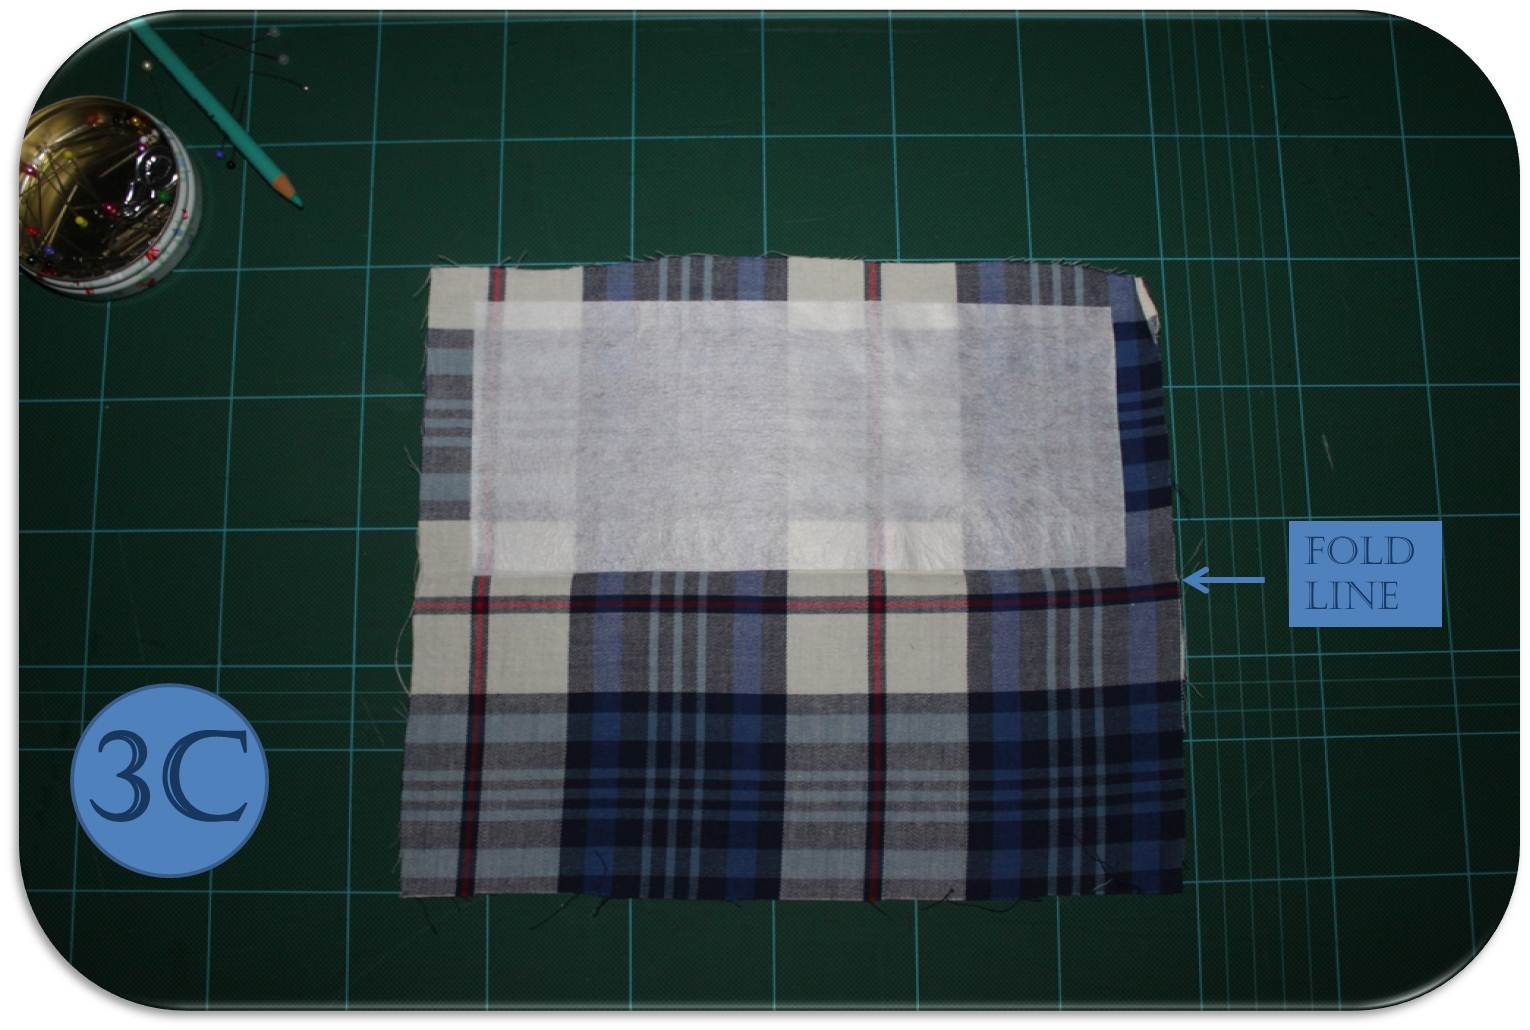
C. Fold the pocket piece in half and open again. With pocket piece wrong side up, place interfacing on fold line, so that it is about 2cm from top and positioned centrally, about 2cm away from both sides of pocket piece. Ensure fusible side of interfacing is facing down and then iron in place.


D. Turn pocket piece over so that right side faces up. place cut edge of cuff along top edge of pocket piece (ignore cut corners in the photo - we will do this later!)


E. Fold pocket piece in half so that cuff is enclosed in pocket and interfacing faces up. Pin in place. Now cut corners!

F. Sew along one open short edge and along top. Leave other short edge open.


G. Turn pocket right side through open side.

H. With fingers, turn raw edges into pocket piece and position pocket in the centre of right side of one lining piece. Pin in place - make sure pins keep turned-in edge secure.

I. Top stitch pocket onto lining along short edges and bottom. Ensure the sewing secures the turned-in edge.


4.
Take shirt bag pieces and place right sides together. Pin in place. With 5/8" seam allowance, sew along sides and bottom.
Pinch 1 corner of bag and fold onto itself (see photo). Measure 1.5" (4cm) from corner point down seam and pin in place. Sew across. Repeat for other corner.


5.
Repeat step 4 for lining bag pieces.


6. Straps
A. Cut 4 strips of shirt fabric (I used the sleeves of the shirt) 2.5" x 12".


B. Repeat with lining material


C. Place two shirt strap pieces right sides together and sew along one edge (I use the width of my machine foot as the seam allowance). Do the same with the other two shirt strap pieces.

D. Repeat 6c for lining straps


E. Place one shirt strap with one lining strap, right sides together. Pin in place. Sew along both long edges (again, use machine foot width as seam allowance). Turn right sides out.

F. Repeat 6e for other strap pieces.


G. Top stitch 4 evenly spaced lines along length of each strap. Use longest stitch length. See photo for guide.


7. Constructing Bag
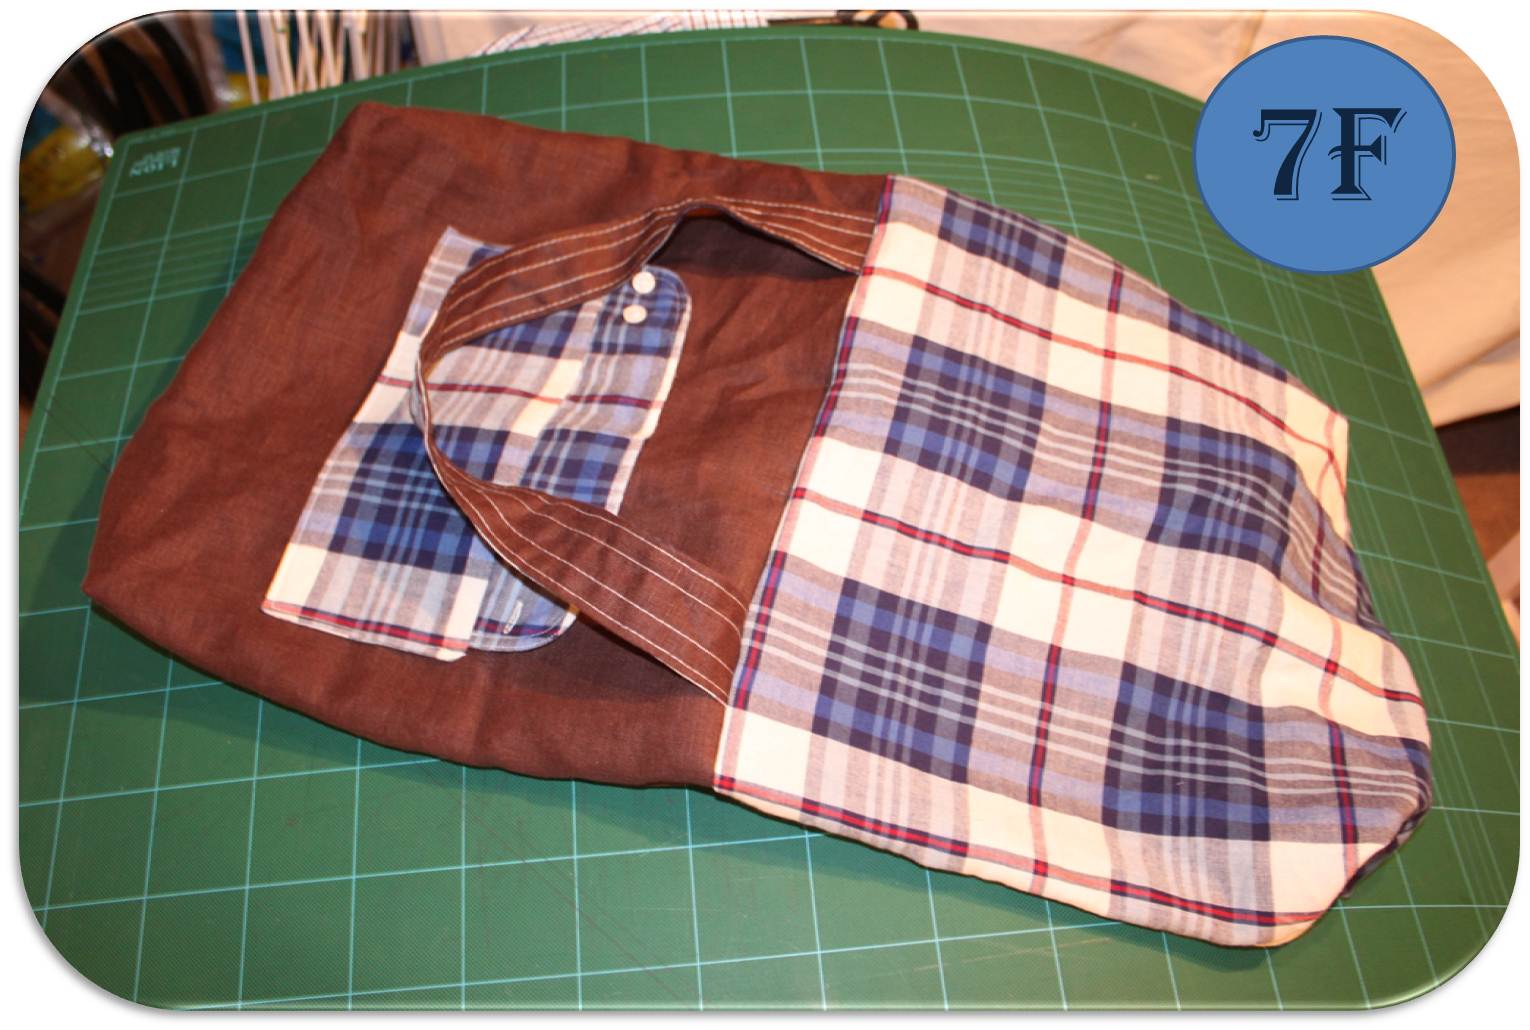
A. With shirt bag wrong side out, put lining bag inside so that right sides are facing.


B. Place one strap piece between shirt and lining. Position strap ends to line up with bag top and 2" away from edge on either side of bag. Pin in place. Make sure strap isn't twisted inside!


C. Repeat for other strap on other side of bag.

D. Pin shirt and lining together, ensuring seams line up.

E. Sew around edge (5/8" seam allowance) - leave a 2-3" gap open.

F. Turn back through gap.


G. Push lining down into bag.

H. Pin top of bag flat, pushing fabric at gap down. Top stitch along top edge of bag - ensuring to enclose the gap.


And you are done! Hope that made sense to you all - if you have any questions put them in the comments section and I'll try and answer them for you.
Don't forget - if you can't see any of the photos very well, click on them to see in more detail.

And the best bit - it's reversible:


I'm linking:


Related Posts with Thumbnails