

Long time no post - whoops! Sorry about that folks, life has been pretty hectic these last few weeks.
But I'm delighted to be back and to finally give you the tutorial to Jen's Bag. You may remember I showed you the finished bag back in March for my friends birthday present and promised to give you the tutorial. I can't believe I'm only getting the tutorial on my blog now, but those annotated photos took a lot longer than I thought they would!!! Anyway - enough excuses, let's get on with the tut:

1 large man's shirt
30" x 34" piece of lining fabric
10" x 12" piece of lining fabric
9.5" x 4" piece of medium weight iron-on interfacing (approx)
Thread, sewing machine, pins, ruler!
Method:
1.
Cut 2 rectangles 15" x 17" (38cm x 43cm) out of shirt. I chose to have the shirt buttons running horizontally across the top of the bag. You can position the buttons as you like. The size of the rectangles was dictated by the size of the shirt - so choose your size as you see fit.

2.
Cut 2 more rectangles the same size from the lining fabric (I used brown linen)

3. Pocket
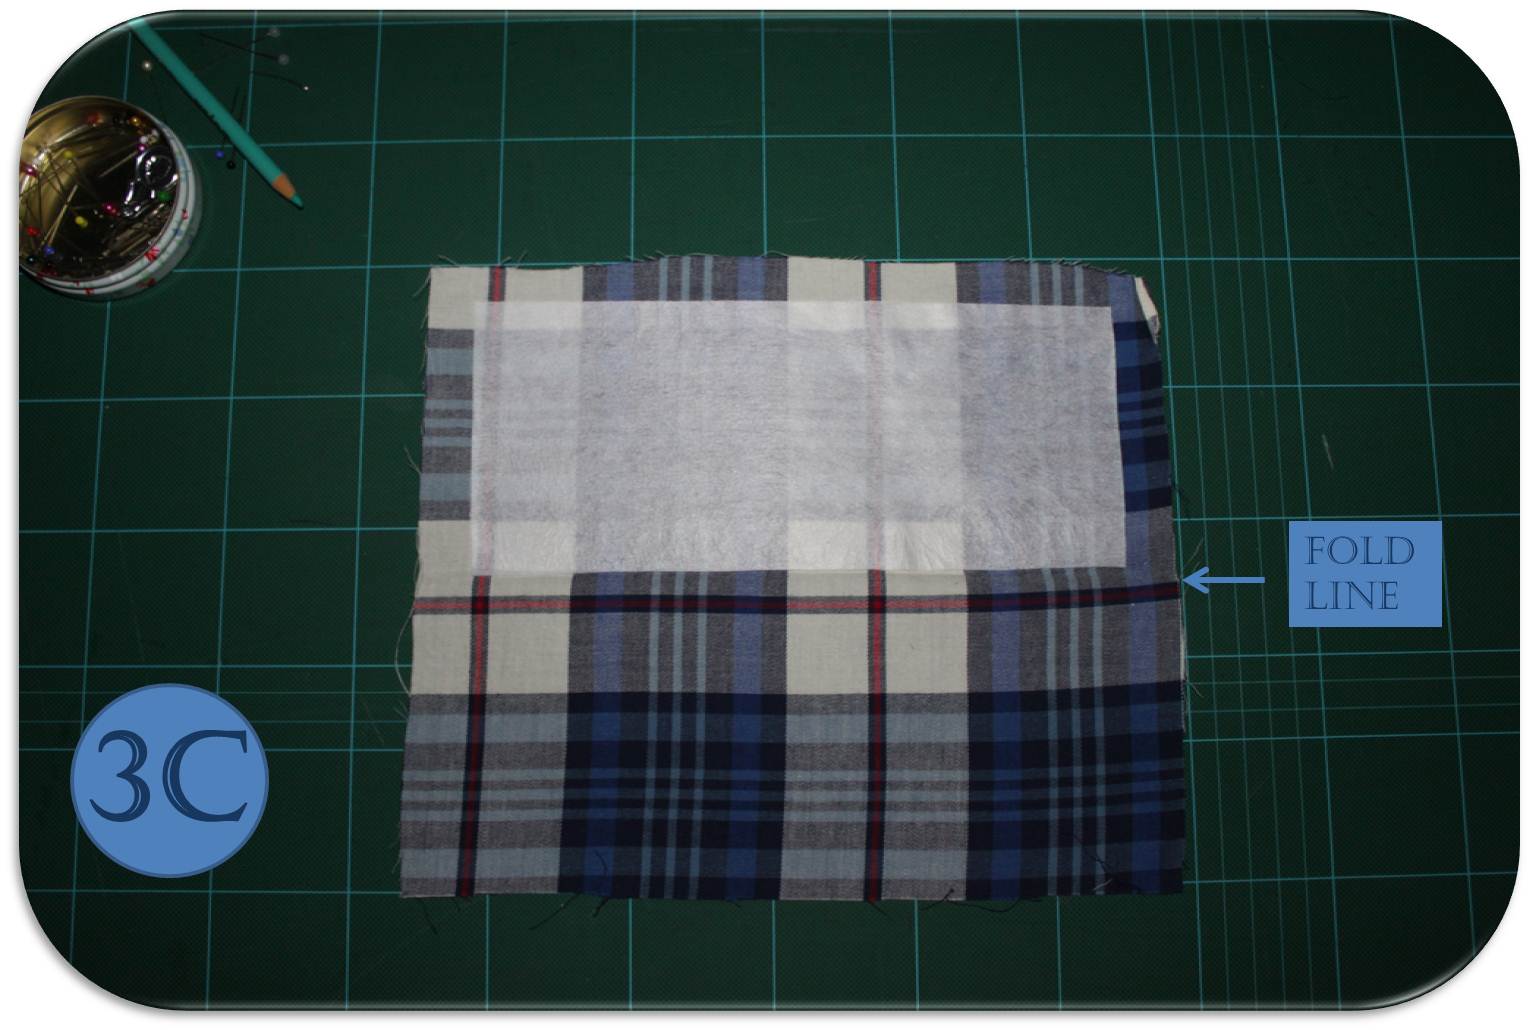
A. Cut off one shirt cuff. Cut a rectangle 1.5" (4cm) larger than cuff length. My cuff was 9.5" (24cm) so my pocket piece was 11" (28cm) long. The depth of the pocket is up to you. I cut mine 9.5" (24cm) which will make the finished pocket about 4.75" (12cm) deep.

C. Fold the pocket piece in half and open again. With pocket piece wrong side up, place interfacing on fold line, so that it is about 2cm from top and positioned centrally, about 2cm away from both sides of pocket piece. Ensure fusible side of interfacing is facing down and then iron in place.

F. Sew along one open short edge and along top. Leave other short edge open.

H. With fingers, turn raw edges into pocket piece and position pocket in the centre of right side of one lining piece. Pin in place - make sure pins keep turned-in edge secure.
I. Top stitch pocket onto lining along short edges and bottom. Ensure the sewing secures the turned-in edge.

Take shirt bag pieces and place right sides together. Pin in place. With 5/8" seam allowance, sew along sides and bottom.
Pinch 1 corner of bag and fold onto itself (see photo). Measure 1.5" (4cm) from corner point down seam and pin in place. Sew across. Repeat for other corner.

5.
Repeat step 4 for lining bag pieces.

6. Straps
A. Cut 4 strips of shirt fabric (I used the sleeves of the shirt) 2.5" x 12".


D. Repeat 6c for lining straps

F. Repeat 6e for other strap pieces.


7. Constructing Bag
A. With shirt bag wrong side out, put lining bag inside so that right sides are facing.


D. Pin shirt and lining together, ensuring seams line up.
E. Sew around edge (5/8" seam allowance) - leave a 2-3" gap open.
F. Turn back through gap.
H. Pin top of bag flat, pushing fabric at gap down. Top stitch along top edge of bag - ensuring to enclose the gap.

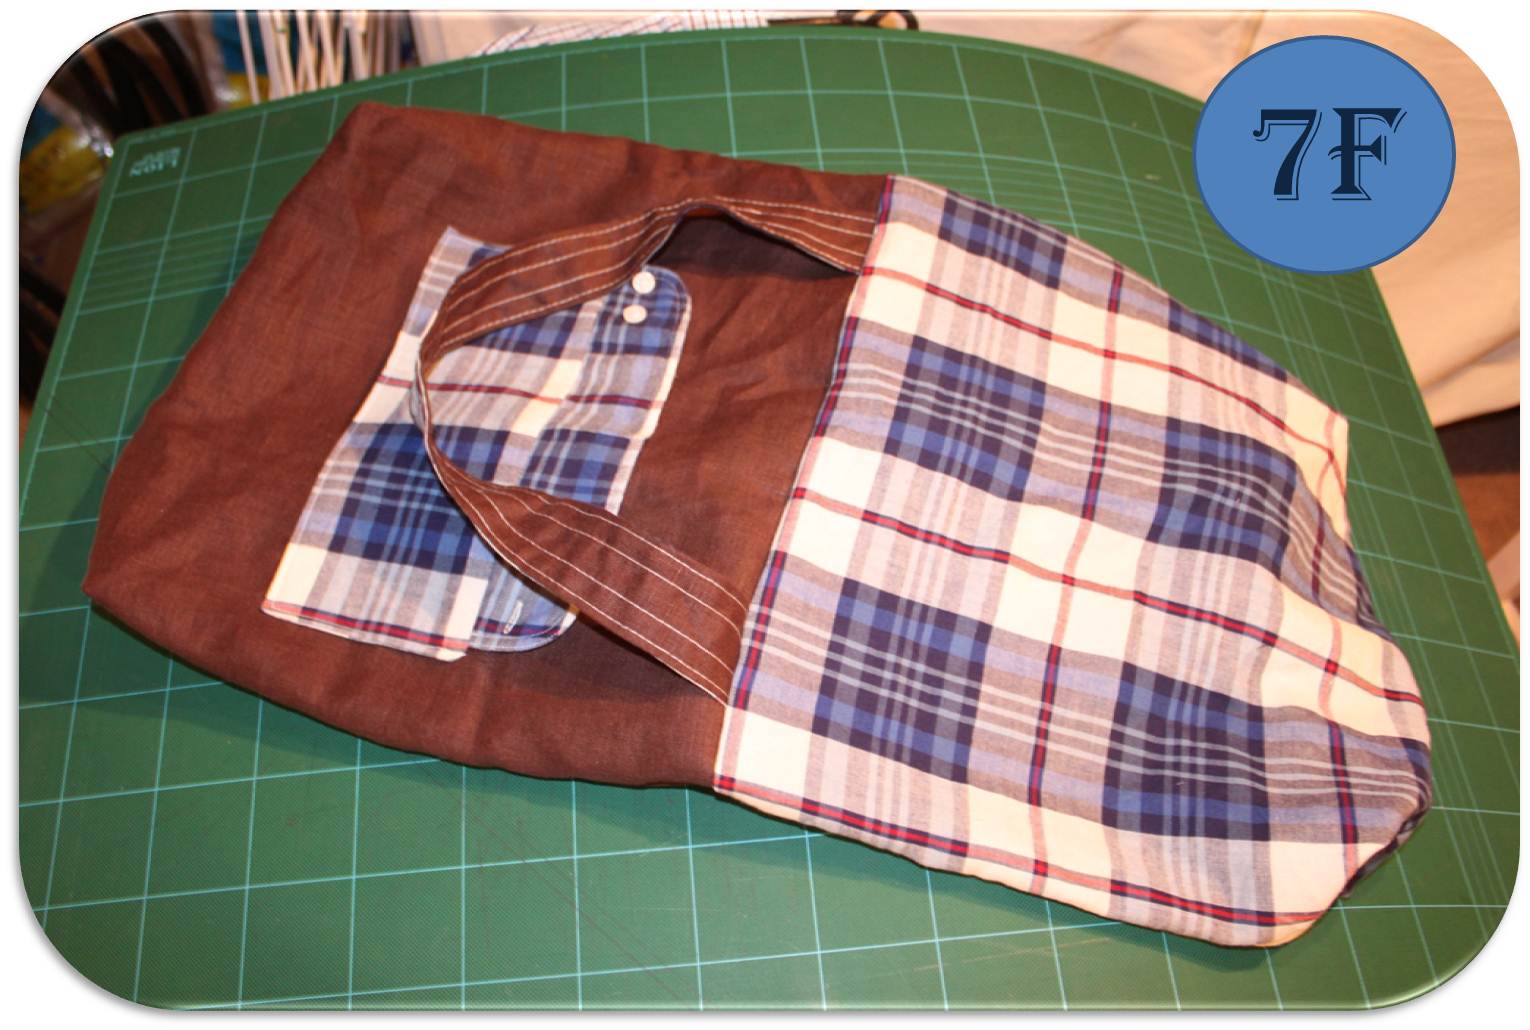
And you are done! Hope that made sense to you all - if you have any questions put them in the comments section and I'll try and answer them for you.
Don't forget - if you can't see any of the photos very well, click on them to see in more detail.
And the best bit - it's reversible:


I'm linking:


Oh wow, I love this! Thanks so much for sharing this tutorial ;o)
ReplyDeleteWorth the wait, great instructions, can't wait to try it out!
ReplyDeleteWow, what a great tutorial! you went all out! A++ !! I know what you mean about hectic, too much to do...
ReplyDeleteI love it!!! I linked to your tutorial on Craft Gossip Sewing:
ReplyDeletehttp://sewing.craftgossip.com/tutorial-reversible-tote-from-a-button-down-shirt/2011/05/09/
--Anne
Love this tutorial:so easy to make!
ReplyDeleteThanks so much for sharing with us ^__^
I have a blog about sewing and vintage...If you want to say "Hello!"
http://alicecloset-sewing.blogspot.com/
Oh, this pleases me! I'm a former flight attendant and I have so many brand new uniform blouses that I've been looking for a new use for. This is brilliant!
ReplyDeleteHey everyone - so glad you all like the tutorial! If anyone makes their own version of the bag I'd love to see photos and show them on the blog!
ReplyDeleteAnne - thanks for featuring the tutorial on Craft Gossip, I'm thrilled!!!
I LOVE the idea of a reversible bag! I made a bag this past weekend that turned out to be reversible (I didn't know when I started)!
ReplyDeleteAnyway, I love that this is a larger bag and thank you so much for including a tutorial for us to follow!
When I make one I'll be sure to let you know!
I'm visiting from the Pity Party!
Kristi @ A Nest in the Making
Suzie - Great bag - I love the plaid too! Thanks so much for linking to the Sunday Showcase Party - I greatly appreciate it. I have featured this today. Hope the rest of your week is wonderful~ Stephanie Lynn
ReplyDeletewww.bystephanielynn.com
I would love to feature this adorable bag on Reduce, Reuse, Upcycle. Feel free to stop by and grab a featured button. Thanks!
ReplyDeletehttp://reuseandupcycle.blogspot.com
The bag is adorable and I'm definitely going to try it!
ReplyDeleteCan you also make a tutorial for the other bag hanged just next to it? It is absolutely AMAZING! Is it made with macrame knots? I would love to have instructions for this one too, if possible... Thanks!