Wednesday 29 June 2011

Oh I do like to be beside the Seaside!


I'm off on my holidays on Monday - and I. Can. Not. Wait! My boyfriend and I are jetting off to Kuala Lumpur and then touring around Thailand for three weeks. I have been before and I also grew up in Indonesia, so I have quite an affinity to Asia. But this will be the furthest my man has travelled and the first time in Asia - so I will be tour guide for the three weeks (the poor soul doesn't realise yet that I have organised out Bangkok sightseeing around all the best fabric shops!).

I've been busy trying to organise my wardrobe for the three weeks - much harder than it sounds. I'm taking a rucksack rather than suitcase, so space is at a premium. And because we are doing so many different activities (City break, jungle trekking, beach hol, scuba diving) it's hard to get the right balance. I think the key is to pick a colour scheme and work everything around that. Mine has turned out to be Red, White, Blue and Black.

My other issue was my hand luggage bag. I didn't want anything too big, as it would be cumbersome while walking from place to place with my rucksack on my back. After trailing the shops unsuccessfully, I decided I should just try and make something (as hinted here) - and therefore be able to tailor it to my needs....those being:
  • Zip closure (for safety)
  • The right size for hand luggage requirements
  • Easy to carry
  • Lots of pockets
  • Suitable to double up as a beach bag
  • Therefore must also be large enough to carry a big towel and other beach paraphernalia!

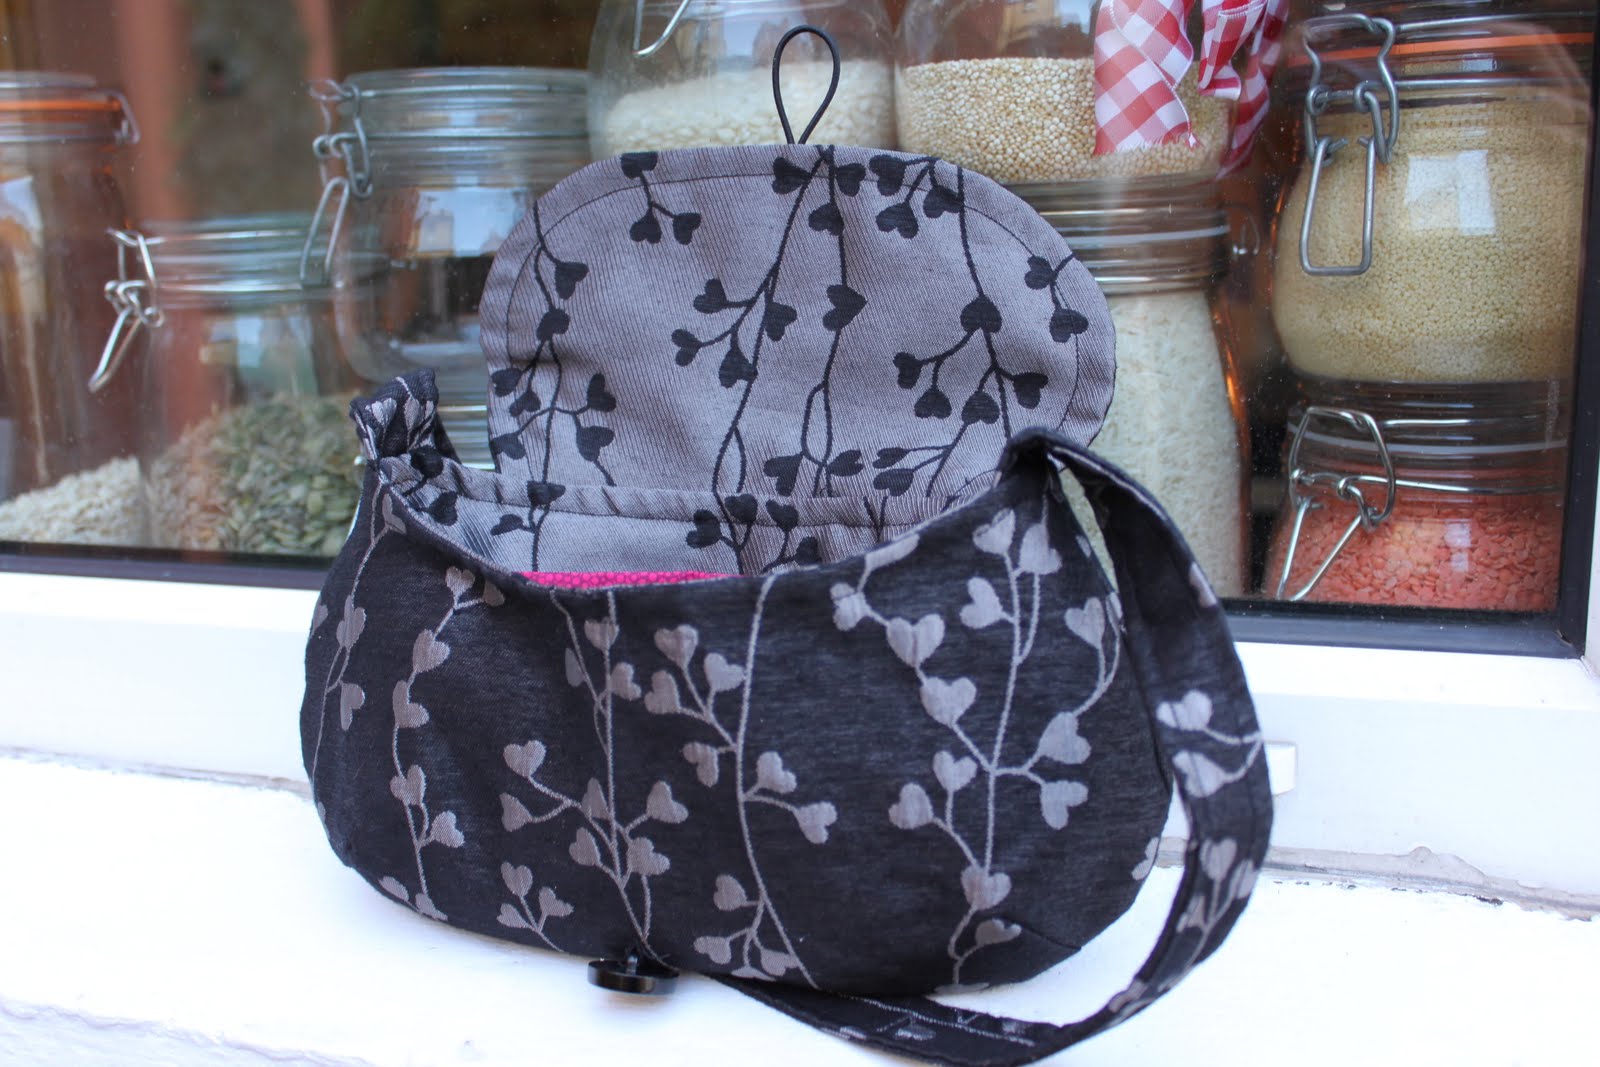
And so my holiday bag was born:

I pretty much made up the design - but it's really just a classic tote bag (with the pinched bottom corners) with a zip closure. Because I wanted it lined, I followed a tutorial on how to make a lined zip purse - but just scaled it up considerably! You can see from the photo below that I managed to line up the stripes pretty much perfectly (if I do say so myself!) on either side of the zip.


The straps are sewn into the base, and just over half-way up the bag for extra strength. They are made up of quite rough hessian type fabric, so I decided I needed to sew fabric onto the tops of them so that they wouldn't rub my shoulders or hands raw when carrying the bag! It ended up turning out to be one of my favourite features of the bag.


I decided to add a fun contrasting outer layer, which, when the straps were sewn down, created three pouch pockets on either side of the bag - perfect for carting your suncream and book to the beach. For neatness, I lined this strip too.


 As you can see the photo above, I didn't line up the red stripes at the sides. But you know what? I quite like it like that!


Inside the bag I made two types of pockets. On one side, I used my newly acquired skill to make a zipped pocket (learnt from making this bag) - again, super-sizing it!


And on the other side I used some left over red striped fabric to make a pouch pocket which was sewn onto the lining. I was going to divide it up into multiple pockets - but in the end it just has the top left hand corner separated into a pocket big enough for suncream, or mobile or wallet (something small basically!). I left the rest open as I'm going to be taking an A4 size folder with all my documents in it, and this fits in perfectly (it will also fit the all important glossy mags to read on the very long flight too!). It does flop open a bit though, so I put a little velcro closure on it.

Oh, I cannot wait to put this bag into use! Hot, sunny climes - here I come!

Tuesday 28 June 2011

Tuesday's Tutorial Treat: Sleep Shorts


Time for another Tutorial Treat! Today I'm bringing you the cutest, and easiest, tutorial on how to make your own Sleep Shorts (or Short PJ Bottoms as I would sloppily call them!). This comes from the lovely blog Prudent Baby. This is a really popular blog, especially among mothers, but they have so many gorgeous non-baby things too - like these lovely shorts!


Get the tutorial here.

Monday 27 June 2011

Meet Flo


You may have noticed her a couple of weeks a go on this post, but I thought she deserved a proper introduction as I'm very excited about the new addition to my sewing team - meet Florence , or Flo to her good friends, my new (to me) mannequin!
I spotted a shop closing down (which was sad to see, because it's a little independent boutique and I always feel sad when those little shops don't succeed  - all too common at the moment unfortunately) and saw that they were selling off their mannequins - so I knew one had to come home with me!
An extra bonus is that she is actually pretty similar to me in size! Ok...her waist and hips are probably on the small side (but not too much), but her bust is pretty spot on to mine. And I'm hoping she will make hemming a lot easier (thank god!) too.


Apologies for the awful mess in the background of these photos - my sewing room is also my boyfriends washing room (shirts hanging everywhere waiting to be iron - by him...I don't do that!!!) and also general store room (it's a converted attic). The top on Flo is one I started making almost a year a go (mentioned here) (out of a sample curtain!), but I discovered that the fabric was really hard to work with....so I have put off doing the self-bias bound arm holes for a long time because I know they are going to be so fiddly! But I'm hoping by having it on Flo I will be more inclined to finish it....watch this space.

Photo from my post back in August.

Thursday 23 June 2011

What am I working on...


Just a little sneak peak at the latest project that has been under my sewing machine. Yep, another bag! What can I say, I LOVE bags (my boyfriend would say I love shoes...but I can't make them....yet!)!!!

Tuesday 21 June 2011

Tuesday's Tutorial Treat - The Gilded Skirt


Yeay - time for another tutorial!

I just recently discovered Leanne's fabulous blog Elle Apparel - and if you have yet to discover it yourself then click on the link and have a good browse through it. She makes some really amazing things - including lots of gorgeous skirts. She has quite a few tutorials on her page but I have picked out one of my favourites to share with you all today:

Monday 20 June 2011

Burda Style July

 Well the first glimpse of the July Burda Style magazine is up on the German website. I was really excited about June's offerings, but unfortunately not as much with July:

I actually really like this dress - but 2 things mean I will never make it: 1. it's a knit and I haven't attempted knit fabrics yet (!) and 2. the big tie detail would draw attention straight to my hips - which is my biggest part! It looks really lovely on the model though!
 I'm a sucker for anything blue at the moment, so this is probably affecting my opinion of this top - but trying to look past that, I do think this could be quite a nice work top.

 This Kimono looks nice enough, but again, I would probably never make this.

 Cute enough, and lovely on the right person - but not my style.

 These look like very nice trousers and I would be tempted to try these...

 Interesting design - but I fear I may look like I'm wearing a tent, or am pregnant, in this dress!

 There seems to be a 'black' theme in this magazine, so the next few a all black. It's hard to make out the details of this dress without the technical drawing, so I look forward to seeing that, as potentially it looks like a nice shape.

 Same for this skirt, could be one to add to be ever growing pencil skirt pattern collection!

 Nice, but a knit - so not for me (at the moment!)

 I think this could be a winner for many people - it looks like a classic shirt/t-shirt which would suit a lot of people.


This dress may be the deal maker or breaker for me - at the moment I really like it, and think it would really suit my shape - but I want to see the technical drawing.

On to a purple theme now. I think this could be quite a nice smart/casual dress that would be very comfortable to wear.


 This jacket would really suit my shape - but I'm no where near ready to tackle tailoring!

 And this is a STUNNER! BUT - it's plus size! Yeay, for the larger lady...but I'm not sure I'm skilled enough to scale it down. Perhaps I could give it a go....

 Another lovely plus size dress.

 And another.

So what does everyone think? Anything here that excites you and makes you want to get your paws on the July copy?

You can see these and more designs from July here. And you can see some model shots here.

And I shall leave you with Burda's favourite fashion item - the over sized/harem pant....Why Burda, why?

Friday 17 June 2011

Lace dress refashion

I have been dying to share this dress with you all (which I hinted about here) - but I dithered on hemming it for AGES (I really have an issue with hemming...I don't know why!). But, it is finally done and ready for it's big reveal.

This whole project started out because I nabbed a rather large and unflattering navy blue lacy 'dress' for £1 from Primark (I'm normally not a Primark supporter as I am doubtful about how they can mass produce clothing for so little without it having some unethical aspect along the line - but that's a whole other story! Plus the quality is really crap and I hate this 'throw away' society shops like this have played a part in creating - 'we' have no respect for clothes anymore....sorry, rant over). I had no intentions of keeping the dress in its original form, but because I had picked up a size 16 (largest that was left) I had a fair bit of fabric to play with:


The dress needed to be underlined/lined and I had originally thought something dramatic and bright, like hot pink. But when I held up the pink under the lace it looked mega tacky! So with a bit of searching around my local fabric store, I happened upon an off cut of taupe lining in the remnant bin - for a lovely bargain of about £2! I think the taupe colour (which is not normally a colour I gravitate towards) provides a more elegant aspect.

The plan was to use the bodice from a pattern and then 'make-up' the skirt. I had originally planned to make the whole dress out of the lace, but once I started laying out the pattern pieces it became evident that that wasn't going to be possible. So the midriff section was made using only the lining material. I do like the contrasting aspect, but to be honest, it is one layer of polyester lining material, so it is neither very secure nor flattering in certain angles!

The bodice is made from New Look 6557, view C (the yellow dress on the pattern cover). I made the skirt by joining strips of lace together to make the largest rectangle I could, cut a strip the same size out of the lining, and then gathered.


A shot of the back - again totally from lining, because I didn't have enough lace. I used an invisible zip, which had to be picked out a couple of times because I wasn't getting the waist line joined up perfectly - turned out my two back pieces were slightly different sizes (er - how does that kind of thing happen?!!!)! Easy enough to fix though - thank goodness! The straps are made of navy ribbon.

My favourite part of the dress is the underlined bodice, it turned out so well and I just love the colours together. It's perhaps a little big for me, but fine when I wear a bra - I just need to go and buy a navy one so that it's not so noticeable!


All in all, I do like the dress very much. I honestly only made it as a challenge to myself, and as such, I'm very happy with the results. However, I don't see myself wearing this dress very much - to be honest, I don't know what occasion it would be most appropriate for. But it ended up costing me less than £5 in total to make - so not a massive loss!

Wednesday 15 June 2011

Half-Moon Handbag


My latest escapades in bag making has produced this very handy Half-Moon handbag, again by my favourite bag pattern maker Keyka Lou (I've had a look on her site to link directly to the pattern, but can't find it! Perhaps she has discontinued this pattern?). I decided to make this bag, which is very similar to my curvy clutch design, but with a shoulder strap, as I am in desperate need of a black handbag that will go with everything and is small enough to take out in the evening - and I think this fits the bill pretty well.


This bag came together rather quickly. It's not as sturdy as my clutch, as it doesn't include sew-in interfacing, which made it a lot easier to sew. The closing is a hair elastic (!) sewn into the flap, which loops round a shank button that I had in my stash.


The fabric is a curtain sample which I had picked up for £1.50 from my local fabric shop. I had planned to line it with plain black cotton, however when I unpicked the white lining off the curtain I discovered that the 'wrong side' of the black fabric was the reverse of the pattern - I knew it would work great as the bag lining.


The pocket adds a fun pop of colour when you open the bag. I have to admit, this bag is a lot tamer than I would normally like to make things, but I wanted to make sure it was as versatile as possible.

I hinted recently about being one step closer to my 'dream' - which is selling my bags. Easy enough you would think, but I seem to be a big procrastinator! Anyway, although I don't plan on selling this bag, I thought I'd sew in one of my prototype labels. I plan to call my line 'Third Time Lucky' as all the pieces will be made from recycled fabric and restyled to give them a new lease on life and another chance at being loved! I've been slowly (my boyfriend would debate that choice of word!) collecting second hand clothes and other bits of fabric (for example this curtain sample) which I think will work well being refashioned into bags, or other things, so I have quite a lot of resources ready - I just need to get going...I'll keep you posted!

Tuesday 14 June 2011

Tuesday's Tutorial Treat

We all love a good tutorial (check out my own here), and I have been collecting links to my favourites for quite some time. So I thought I would stop being so selfish and share them with you all!

Welcome to my new theme day: Tuesday's Tutorial Treat! (you gotta love alliteration!)


Each week I'll feature a tutorial that I have found and hopefully it may inspire some of you to try it out. I would image that some of the tutorials I'll feature you will have seen before, but perhaps I may introduce you to a wee gem.

So to kick things off, I'm linking you to quite a MEGA page - a whole blog dedicated to sewing tutorials!!!


Friday 10 June 2011

Work in progress

Thanks for all your feedback on my question about how to approach telling people you have made something - it was really fun to read all your comments, and it's good to know that I'm not the only one expecting to be showered with compliments whenever I'm wearing something me-made!!!

I'm so glad it's Friday - I've had a really awful week in work and I'm about to head out for a well earned dinner with my man....yeay!

So I'll just leave you with a couple of pics of what I've been working on this week. I'm really excited about this...for a couple of reasons...

One - it's turned out really nice (I'll try and take proper photos over the weekend to share the end result with you next week)...


and two - it's one step closer to my dream....

P.S. I have also finished my lace dress, which I hinted about previously...but the weather has been so dismal recently that photo ops have been few and far between - fingers crossed for this weekend guys!!!

Monday 6 June 2011

Do you like my top - I MADE IT MYSELF!!!

My fellow stitchers (term shamelessly stolen from Tilly), I wish to pick your brains. You see, last week I finished my lovely (if I do say so myself) Pendrell blouse and I excitedly wore it out for lunch with my friends the very next day. I was all primed and ready to gush 'what, this old thing - why I made it myself'....but the compliment I was waiting for (expecting??!!) never came. I did get a lovely compliment about my white jacket and my purse ...but even though I was obviously very happy to be complimented at all (I don't want you thinking I expect compliments thrown at me every day!), I really wanted to say 'Yeah yeah, but what about my top - did you not notice my TOP??!!'. But you can't do that - or can you?


Offending jacket and purse!

So this is what I wanted to ask you...when you make something and wear it out for the first time do you tell everyone you see straight off that you made said item, or do you leave it for them to comment and then say in a very blase manner 'oh yes, I made that'? If you are anything like me, you are just so excited and pleased to have made something (actually wearable) that you are dying to tell everyone! But then I fear of either sounding like a complete show-off (which is not what my intentions are at all) or else I fear that they will get sick of me saying it. Or worse - and here comes the complete paranoia - if you tell someone that you made something then they are obliged to tell you how nice it is...even if they may not think it is!


Yes yes, enough about the jacket - what about this top??!!!

So I'm curious - what do you do in situations like that?

P.S. I wore my Pendrell the next day to work and I got a lovely compliment....on my shoes!

Wednesday 1 June 2011

My Pendrell!


Finally - an 'FO' to share with you! It's been a while since I've had some finished sewing on this blog so I'm really excited to be able to show off my lovely new Pendrell top! I have long admired all the lovely Pendrells out there - for those of you who have not heard of this top before, it's the first pattern from Tasia of Sewaholic. The top has received rave reviews, and I have to say that I am jumping on that band wagon - I LOVE this top. It was fairly easy to make, even in slippy polyester fabric. I followed the sew-along which Tasia held and it was fantastic help. The instructions in the pattern are good - but the sew-along has lots of photos to help you fully understand how to do everything, which I always find very useful.


I decided to go for view A as I don't think I'm really a 'frill' kind of girl - and I have to say that I love this draped sleeve. It really takes the top from basic to classy. When I saw the pattern piece for the draped sleeve I was confused...and nervous - I didn't know how my slippy fabric would behave. But basting really is the key...and pins. Lots and lots of pins!

I had heard that the pattern has a lot of give in it - intentionally so. Based on my measurements I should have cut a size 10, but when I checked the finished garment measurements I decided to try making up a size 8 - and I'm glad I did, it is absolutely perfect for me! Sewaholic patterns are made with pear-shaped ladies in mind, so as a fellow pear (!) I am so delighted that I can cut out a pattern and it fits well without having to grade into a larger size at the hips. I know a lot of ladies had to do a FBA when making up this pattern though, so bare that in mind if you are thinking of making this up and are not pear shaped! Oh, I also didn't bother with a muslin and luckily it turned out that I didn't need to (phew!). I have to admit that I find sewing up a muslin very boring and because I sew so slowly (or rather, infrequently) by the time I get round to sewing the real fabric, I have slightly lost interest!


I know Tasia always wears her Pendrells tucked in, but I equally like the top un-tucked, for a more relaxed look (as above).


Here is a close-up of the print. I'm really into blues at the moment, so this fits into my wardrobe very well. Actually, I know right now that this top is going to be the most worn item that I have sewn. So far I have sewn up things that I like, but aren't things I would wear on a daily basis. It's something I've been thinking about recently and something I think I need to bare in mind when making my future sewing plans. Speaking of future sewing plans...I see many more Pendrells...in lots of different colours!
Related Posts with Thumbnails