Showing posts with label refashion. Show all posts

Monday, 11 July 2011

101 things to do with a tea towel...

...OK, just two things to do with them, but 101 sounded better!

Last week I shared with you the camera strap cover that I made for my holidays. Today I'm sharing another couple of quick things I made to take away with me. 

For myself, I made a bag to store my undies in in my rucksack and make sure they all stay together:


The easiest thing to make - it's a tea towel folded in half! I added a big button and some chord which I had in my stash for a fun closure. Not overly necessary, but I thought it was cute. I also decided to sew on a little bit of lace that I had, just to add a nice detail - after all, my undies deserve no less!


I also whipped up a bag for my boyfriend. No cute lace details on this one - I kept it as 'manly' as possible. This is just two tea towels sewn together and a large shoe lace is threaded through a top loop to close. This is for his dirty laundry while we are away:


Friday, 17 June 2011

Lace dress refashion

I have been dying to share this dress with you all (which I hinted about here) - but I dithered on hemming it for AGES (I really have an issue with hemming...I don't know why!). But, it is finally done and ready for it's big reveal.

This whole project started out because I nabbed a rather large and unflattering navy blue lacy 'dress' for £1 from Primark (I'm normally not a Primark supporter as I am doubtful about how they can mass produce clothing for so little without it having some unethical aspect along the line - but that's a whole other story! Plus the quality is really crap and I hate this 'throw away' society shops like this have played a part in creating - 'we' have no respect for clothes anymore....sorry, rant over). I had no intentions of keeping the dress in its original form, but because I had picked up a size 16 (largest that was left) I had a fair bit of fabric to play with:


The dress needed to be underlined/lined and I had originally thought something dramatic and bright, like hot pink. But when I held up the pink under the lace it looked mega tacky! So with a bit of searching around my local fabric store, I happened upon an off cut of taupe lining in the remnant bin - for a lovely bargain of about £2! I think the taupe colour (which is not normally a colour I gravitate towards) provides a more elegant aspect.

The plan was to use the bodice from a pattern and then 'make-up' the skirt. I had originally planned to make the whole dress out of the lace, but once I started laying out the pattern pieces it became evident that that wasn't going to be possible. So the midriff section was made using only the lining material. I do like the contrasting aspect, but to be honest, it is one layer of polyester lining material, so it is neither very secure nor flattering in certain angles!

The bodice is made from New Look 6557, view C (the yellow dress on the pattern cover). I made the skirt by joining strips of lace together to make the largest rectangle I could, cut a strip the same size out of the lining, and then gathered.


A shot of the back - again totally from lining, because I didn't have enough lace. I used an invisible zip, which had to be picked out a couple of times because I wasn't getting the waist line joined up perfectly - turned out my two back pieces were slightly different sizes (er - how does that kind of thing happen?!!!)! Easy enough to fix though - thank goodness! The straps are made of navy ribbon.

My favourite part of the dress is the underlined bodice, it turned out so well and I just love the colours together. It's perhaps a little big for me, but fine when I wear a bra - I just need to go and buy a navy one so that it's not so noticeable!


All in all, I do like the dress very much. I honestly only made it as a challenge to myself, and as such, I'm very happy with the results. However, I don't see myself wearing this dress very much - to be honest, I don't know what occasion it would be most appropriate for. But it ended up costing me less than £5 in total to make - so not a massive loss!

Wednesday, 11 May 2011

Sneak Peak


I haven't posted much recently about any of my own sewing - to be honest, I haven't had an awful lot of time to dedicate to sewing, and with the gorgeous weather we have been having recently I have been spending more time outside than inside! But, believe it or not, I am actually working on something at the moment! It's a little refashion and I'm very excited about how it's turning out. The pic above is a little sneak peak (the red is a cushion and not related to the project btw!)...I just have to insert the zip and then hem and I will be done - can't wait to share the final result!

Oh - and I was so excited to see that this week I managed to break through the '50 Follower' barrier (hello, and welcome new followers, so glad you have joined us for the ride!) - so, as I promised, I'm going to host a little giveaway to celebrate! Check back on Friday for the goodies!

Monday, 18 April 2011

Rethink Waste Workshop


I recently discovered that Belfast City Council has been putting a lot of emphasis on educating people in the three R's - Reduce, Reuse, Recycle. As part of this initiative they are currently hosting FREE craft workshops focusing on another three R's - revamp, restyle, repurpose. Anyone can go along to these workshops that are being run across the Belfast area and be educated by lovely crafty ladies in how to reuse various things around the house, rather than throwing them away!

Their website explains it far more eloquently than I could so let's hand over to them:


Participation is FREE and whats more you get to take home your revamped and restyled clothes, cushions and furniture.

You do not have to have any experience in revamping or restyling to enjoy these workshops.
The Fashion Souk’s talented team of experts will share their top tips on restyling and refurbishing textiles and furniture. Working alongside you they will demonstrate just how easy it is to give items already in your home a face lift and create new purposeful items - without the hefty price tag.

All materials are provided from ribbons and thread to jumpers, cushions, sand paper & paint, not forgetting your very own item of revamped furniture. At the close of the workshops you will receive information packs on how to do everything covered by the workshops enabling you to get creative in your home.

The workshops are labelled 1, 2, 3 & 4 each workshop covers:
1 Stitching, mending & embellishing
2 Repurposing textiles (jumpers into cushions, hot water bottle covers and much more)
3 Revamping furniture - breathing new life into dated items of furniture and soft furnishings
4 Finishing off all your work

I missed the first workshop (as to be honest, they really didn't advertise this as well as they could have done - a friend in work told me about them) but managed to get along to number 2: Repurposing textiles. As the blurb suggests, we spent the evening taking old jumpers (which they provided!) and turning them into cushions and embellishing them as we liked. Again, all the buttons, ribbons and other lovely such things were all provided (heaven!)...all we had to do was find inspiration. And I really mean that - we didn't even have to sew the cushions up!

To explain very quickly - turn jumper inside out and position with ribbed edge to top (so neck is to the bottom). Get cushion and place on top of jumper, just below ribbing. Cut jumper to same size as cushion (no need to leave seam allowance as the jumper will stretch and this will give a nice snug fit). Take top layer and slide down so that it's ribbed edge is in line with the lower part of the bottom layers ribbed edge. Cut off excess from top layer. Sew along sides and bottoms.Turn right side round and flip ribbed edge over - this is your envelop-like opening to put your cushion through. Insert cushion and then embellish as you like!

Hopefully that wasn't too confusing!

Anyway, here is my little cushion:

Thursday, 10 March 2011

The Refashion Co-op


Have you all heard about the newest blog on the block - The Refashion Co-op? It's a fun place for people to share their refashions and get ideas for new ones. I signed up a little while ago and finally got around to putting up my first post.

Do check out the blog, so many inspirational and talented refashioners out there! If you'd like to see my post, you can do so here.

Monday, 7 March 2011

Jen's Bag

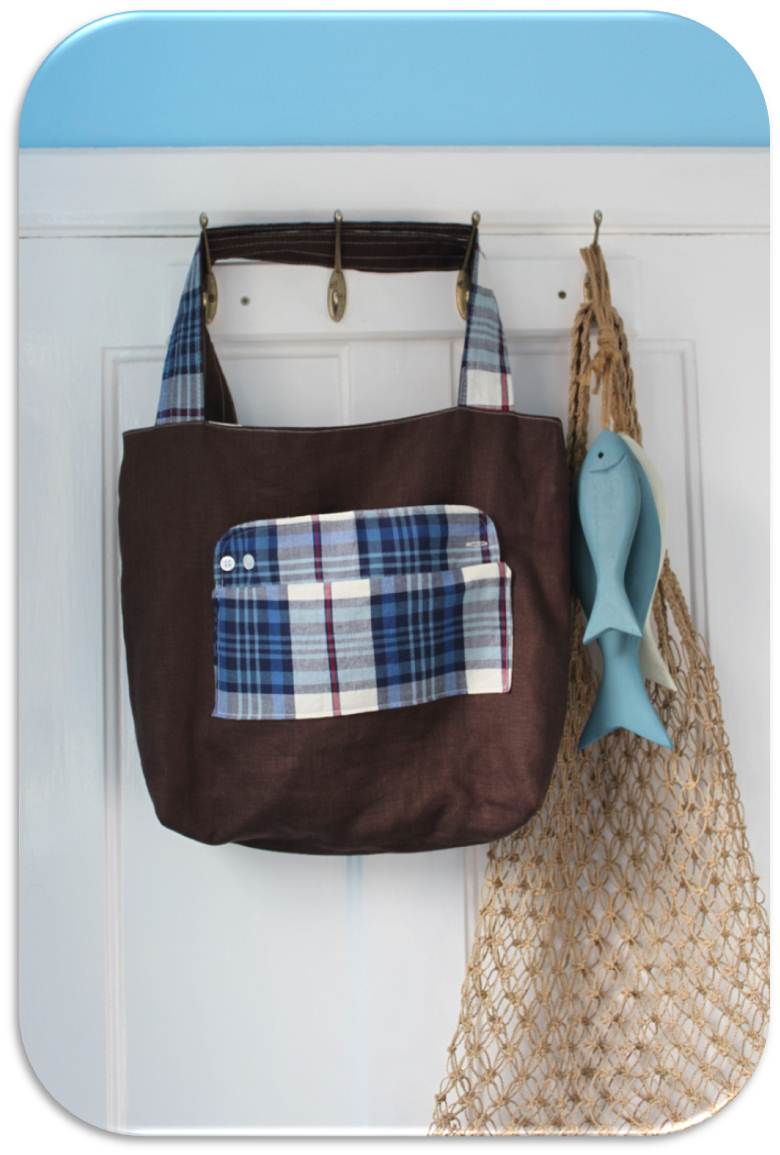
As I mentioned in this post, I have been busy bag making again. This time I made a reversible tote bag for an old friend (Jen) who reminded me recently that she was 'owed' a 'Suzie Bag'!!

She's a bit of a tomboy, so my usual glam clutch wasn't going to be her style so I thought I'd make something a bit different. I have been wanting to try making a tote out of a man's shirt for a while so I played around a bit and came up with this:


As you can see, I kept the front buttons but decided to flip them round so that they made a fun detail at the top of the bag.

As I said, I made it reversible...so here's the inside-out version:

 This side is made out of brown linen which I bought with Jen when we were travelling around Australia (for that added extra meaning!) and I made a pocket out of one of the shirt cuffs and some left over fabric. The straps are made from the same shirt and linen but you see the opposite fabric to the side you are using (if that makes sense!).

Hope she likes it! I took photos of the process so I plan to make a tutorial on how to make it...soon!

Monday, 6 September 2010

Men's Shirt to Smocked Halterneck TUTORIAL!


Well I said I had managed to fit in a little sewing....and when I said little I mean little! This was such an easy top to make that I thought it would be fun to make a little tutorial.


1. Take one large men's shirt (I got this nice pink and white striped one from a local charity shop for the tidy sum of £3.50 because my boyfriend wasn't parting with any of his current shirts - the cheek!) and cut straight across the body below the base of the sleeves. I used a ruler and rotary cutter to get a perfectly straight line (but that's because I, for some reason, do not have the basic ability to cut in a straight line with a pair of scissors!).

2. Turn down the newly created edge twice and straight stitch.

3. Do a quick straight stitch down the front to sew the button piece and buttonhole piece together (so that it won't gape while you wear it!)


4. Now comes the fun part -smocking / shirring! Get some elastic thread and wind gently onto an empty bobbin. Thread your machine as normal with white cotton as the top thread and use the elastic bobbin - threading like normal thread. Adjust the tension to make it a little tighter and then sew! I started and finished each line with a little bit of back stitching just to be safe then to move onto the next line I just lifted the foot and moved the shirt across by the distance of one half of the foot. After trying on the top while adding more lines I ended up with about 10cms/4inches shirred.
Top tip - if you have a button in the area you want to smock, unpick it so that you can easily sew over this area and then sew it on again at the end.
For an excellent tutorial for shirring check out Grosgrain

5. If you like you can leave the top like this and you would be done!! If you leave it like this you could actually wear this as a top OR a skirt! I was going to do this, but after trying out the various options I decided I just didn't suit the skirt version and thought it would actually look quite nice with straps. So....


6. Cut two strips from the sleeves each measuring about 9cm x 50cm. For each one fold in half and sew 1cm seam along long edge and also along one of the ends. I decided to make my ties have pointed ends so my seam at one short end was done at an angle. Turn each strap right side round and iron. Put on the top and mark where you would like the straps to start from. I think it looks better if the straps are quite far apart. Then take off top, double over the ends of each strap (fold 1cm then 1cm again) and sew each in place. Put top on, tie straps behind neck and you are DONE!!!

As I said, so quick and easy. And I love the end result:

I think this would also make a very sweet dress for a little girl!


P.S. I'm linking:


Thursday, 1 July 2010

Shirt Skirt

So...(or sew?)...my first post on my new blog is an FO - yeay! That's the way to start - lets just hope I can keep the momentum going!

I had seen a few tutorials on the web for making a mans shirt into a cute skirt (check out: The Sewing Elf, Adventures in Dressmaking and Craftstylish.com) and when my bf announced he was going to thin out his shirt collection I knew I had to grab one and try it out for myself! The biggest problem though was choosing a shirt that I considered would make a decent shirt....the shirts my bf was chucking, he was doing so for a reason - they were nasty! In the end I opted for the least offensive....but it's brown and maroon, not really my favourite colours...but sure, I thought I'd give it a go anyway even as a learning experience if nothing else!

So here is the shirt as it started out in life:


I cut the sleeves off and cut the bottom part off just below the arm holes:


And then I...er...I stopped taking photos!!! Whoops! Sorry about that. I think I just got too carried away with making the thing that taking photos became less of a priority!

Anyway, I shall attempt to talk you through what I did....

Main Section:
I had hoped that I would just be able to sew on a waistband and be done with it - but alas, life is never that easy! It was much bigger than I wanted so I pinned the sides and sewed. I kept the original base of the shirt  though as it created a nice shape.
I sewed in a hidden clasp between the first and second button to stop it gaping open when I sat down - that was a big help!

Waistband:
Hmmm...I pondered a lot about this. I had hoped that I could use the section from the main shirt body that was left over - but it was too short - curse that big ass of mine!!! So I had read that one of the tutorials used the cuffs of the sleeves to create the waistband. After close inspection I figured that I could indeed use the cuffs for the front of the waistband but I needed to find something else for the back. I ended up cutting double thickness (double the width of the cuffs) sections of the sleeves to make the back of the waistband.
I really loved how the waistband turned out actually - the detail of the cuffs really created a nice aspect - and I used the button holes already there which was a bonus! To keep the design the same on both sides I had to position the cuffs with both buttonholes to the middle, so I just sewed on a button on top of the buttonhole not being used.
The sides of the waistband had to be tapered in to create a smooth line too.

And the final result:


 Close-up of waistband

 Close-up of waistband, open to show symmetry


Thoughts:
In general I am really pleased - particularly with the waistband. It's a tiny bit smaller than I would have liked, that's totally my own fault - pinned too much! And as I said before, it's not really colours I would choose, but I luckily had a maroon top which matched quite well. But all in all, I'm happy!
The best thing though - I made it in one night and wore it out to the pub that night too! Instant gratification!!

It's a really easy process and I plan to try it out again. Unfort my bf doesn't seem to want to give up any of his nicer patterned shirts (even for my good cause!) so I found a cute pink and white stripped shirt in my local charity shop which I will be trying it out on soon.
Related Posts with Thumbnails